How to work with Adobe RGB - and get excellent results!
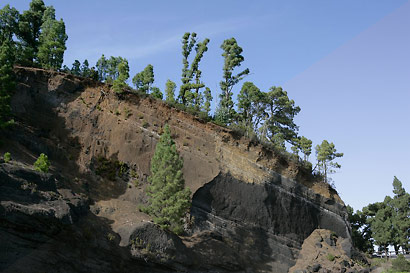
Photo Copyright © 2005 by Mark Zanzig/www.zanzig.com
Today I would like to share a tip with you that I received from Stefan Steib, friend, photographer, and co-owner of lense manufacturer Hartblei. It's about colors. Over a beer in the local pub, I complained to him that the photos of my Canon EOS bodies were often looking grey and dull, and that they sometimes were a nightmare to correct in Photoshop.
He nailed down the problem immediately - colorspaces, and the fact that I am photographing in JPEG (instead of RAW). I was shooting my photos in Adobe RGB colorspace, but was publishing to folks on the web who usually use monitors with sRGB colorspace. Also, most printing services also use sRGB.
Now, the Adobe RGB space contains basically "more" colors than the plain sRGB colorspace. While the amount of data in the picture stays the same, the colors represented by the colorspace on the monitor look different! And if a Adobe RGB photo is displayed through sRGB on a monitor, the colors are basically "made fit" for the smaller sRGB space. The result: bright colors look less saturated, i.e. grey-ish and dull and somewhat wrong.
The Canon EOS manuals, by the way, point out that unless you know what you are doing, you should stay away from Adobe RGB mode and shoot in sRGB or Standard mode. (And, yes, I admit that I clearly was not knowing what I was doing.)
If you want to stay completely out of trouble, Stefan strongly suggests to shoot in RAW.
If this, for some reason (e.g. lack of space on your memory cards), is not possible, Stefan recommends to use Adobe RGB colorspace for the photo shooting and the entire image processing - until the very last step, i.e. when it comes to print or web preparation.
Here's how you do it in Adobe Photoshop (I'm still using version 7, so things might have changed with CS2):
- Shoot the photo in Adobe RGB setting.
- Open the image with Adobe Photoshop.
- When asked, assign the Adobe RGB colorspace to the photo.
- Make all your corrections to the photo as required.
- To finally prepare your photo for printing or web use, open "Picture" > "Mode" > "Convert to profile" and convert from Adobe RGB to sRGB IEC61966-2.1.
- Now save the photo, ideally with a name indicating that it's in sRGB.
As a matter of fact, this has improved my photos so much that I re-did all of the Tenerife shots. Above you see a result comparison of the incorrect (lower right) and the correct (upper left) way of working. Can you spot the difference? I do: the colors in the upper left corner are more saturated, looking much more natural, and take considerably less time to correct in Photoshop. This changed an okay-ish photo into a terrific one. :-)
Tenerife Photo Gallery
Stefan Steib at Flickr
Hartblei Lenses
posted by Mark Zanzig at 11:42 PM
0 comments
![]()